Thursday, June 30, 2011

Let there be light... and nice new ceiling fans, too

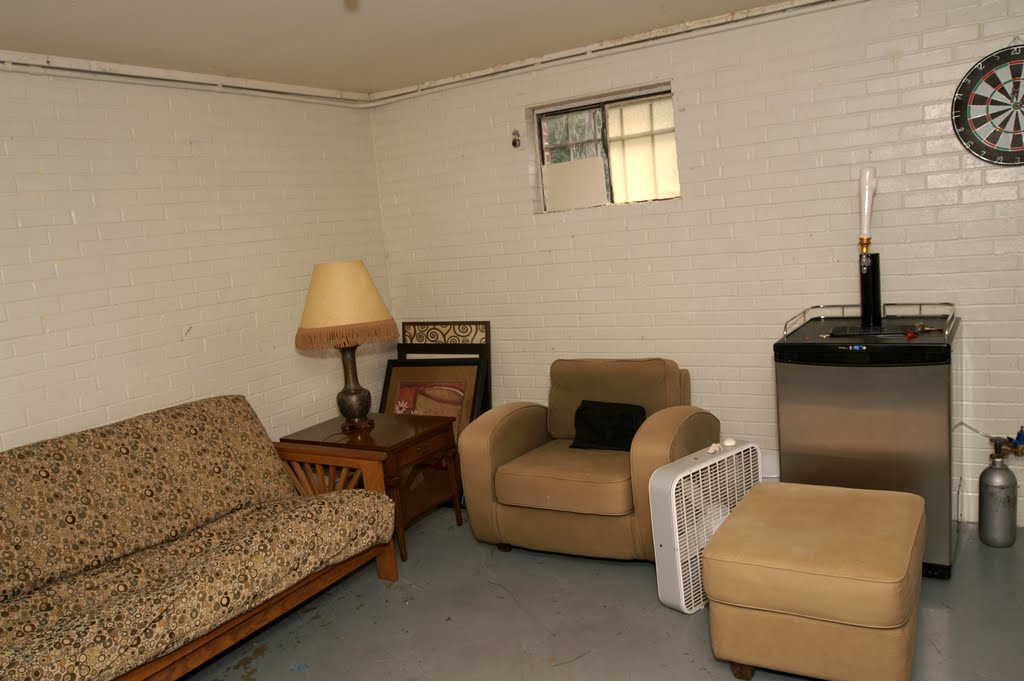
The final step in our basement refresh was to install two ceiling fans and a new light fixture. These replaced some ancient ceramic lightbulb holders and really made a difference in the look and feel of the basement. In this first picture, you can see one of the fans already installed in the background. I'll walk through installing the second fan, and just show off what the room looks like with everything installed.


Installing a ceiling fan is really easy these days. First, identify where it's going to hang, then remove the fixture. These wires showed some signs of wear, so I took off the old tape and re-taped them. 


Next I unpacked the fan. Everything that's needed is included, except a screwdriver. We got these fans from Lowes for $20 on sale. Can't beat that, even though the light fixtures are pretty ugly.


The bracket attaches to the electrical box with a pair of long machine screws. The wires are pulled through the center of the bracket.


The fan motor hangs from a hook on the bracket, which makes the wiring much easier. Match each wire from the fan with the same color wire from the bracket, put on some wire nuts, and that's it.

Once the connections are made, screw the motor housing onto the bracket. A cover then slides up and over the motor to hide the bracket and all the wiring.


Then it's time to attach the fan blades. It's a two step process; first screw the blade holders onto the blade, then screw the whole assembly onto the motor housing.


Another housing then slides up around the light fixture to support the glass light cover. I had already installed the bulb here too, so I could test it out.


Success! The fan worked and the light was bright.

Like I said, a simple project, but getting this air movement in the basement made a big difference.

Tuesday, June 28, 2011

Painting the Basement

Painting the partially finished side of the basement was one of our last major projects in this house. It never was and never will be beautiful, but we felt a fresh coat of paint on the walls, ceiling, and concrete floor could spruce it up a bit. Here are a few "before" photos:

Notice the dingy walls, spotted ceiling, and scratched-up floor.

Ditto. Plus some filled-in holes in the wall.

Yes, the brick wall in this room is pink.
Notice the awesome fuse box cabinet


The stairs were particularly bad. Durham putty to the rescue!


After patching the walls, we had to clear everything out of this side of the basement. We stacked it all on the unfinished side, where I have my shop and where we keep all our other junk, plus the washer and dryer. Of course the cats wanted to explore the new playground we built. Can you spot Ami the orange cat?


<<--- There she is, next to the paper towels, on top of an upside-down chair. Of course, Mable needed to find a cozy spot as well. She ended up beneath the upside-down chair, on top of our dog Molly's old bed. Did I mention she does not like to be photographed?


We taped plastic drop cloths on the door, windows, and floor.

I used a Graco Magnum X5 airless paint sprayer to do this work. I love this paint gun. If you plan on painting everything in a room the same color, you cannot beat the speed and quality of finish provided by a good paint sprayer. Unfortunately, the sprayer requires that absolutely everything that won't be painted needs to be taped or otherwise covered. This includes windows, fixtures, doors, floors, and anything else. It's a pain, but worth it.


 Painting the stairwell proved to be a huge challenge. The ceiling was a good 15' high, so I had to rig up some ladders to reach it. I had a small step ladder against the door so I could get that part of the ceiling, and then leaned an extension ladder against the back wall so I could reach everything else. Not going to lie, it was pretty dangerous to be painting the ceiling by hanging back off the top of this ladder with a paint gun in one hand, wearing goggles that slowly got coated with paint. But, I couldn't think of a better way to do it. I held on tight and took a lot of breaks. I did two base coats and two finish coats. Each coat took about an hour. Not bad for painting the stairwell and two large rooms, including the ceilings. Here you can see how good the walls look, and how much of a mess the paint sprayer made on the floor. Good thing it was thoroughly sealed up!


The sprayer creates a fine mist of paint that hangs in the air for a long time, necessitating a full breathing apparatus to filter out the mist. It was quite nice to be able to open the window after the spraying was finished.


To the right you can see the room with the tape and dropcloths removed. The walls look great; the floor, not so much. Moving on to the next phase!

To paint the floor, first we had to tape the baseboards. I was hesitant to tape on such fresh paint, but we didn't really have much choice. I knew it would peel  off some of the paint upon removal, and it did, but it was still worth it to get a nice clean edge around the rest of the floor.

 Here's a nice before and after of the stairs. The paint we used is a special porch / basement paint that is supposed to hold onto concrete in damp areas better than other paint. We'll see.


Below, you can see how I had to paint myself into a corner. The back door was my only escape after each coat was completed!

And finally, here is the basement after all the painting was complete. Nice walls, nice floor. Still have to remove that blue tape though... 

Next up-- ceiling fans and new light fixtures!


Friday, June 17, 2011

My first woodworking project

When we bought this house, the fuse box in the basement was covered with a useless cabinet assemblage that didn't even cover the entire box. We knew it was going to need to be replaced, so a few weeks ago I tore it out and decided to design and build its replacement.

The first step was to build a frame to which I could attach the door. I used two 1" x 8" x 8' boards, cut so that the box was approximately 4' tall and 2' wide. I used some wood glue and screws to build the box, and then painted the whole thing.

The only portion of the original cabinet worth saving was the 2" x 4"s that the previous owner had managed to anchor to the brick wall, so I made sure my frame would fit around them. Of course, they (and the ceiling) were not quite plumb, so I had to use some shims to get it straightened out. I screwed right through the shims to attach the frame to the braces.

But first I had to cut out notches for the two main lines that feed the basement outlets. I used a 1 1/4" spade drill bit to drill a hole at the depth I needed, and then used a jigsaw to finish off the notches.

Next I had to build the door. I used a leftover piece of beadboard from the bathroom, along with a few pieces of extra molding. I got to use my new corner clamps for this project, and they worked great. I scored these old clamps off eBay, $20 for a set of four. They're aluminum Craftsman clamps. There are much fancier models out there, but these did the trick. After mitering the molding at 45 degrees, I glued the ends and then clamped them overnight. I then stapled them from behind for extra strength.


I rough-cut the beadboard to approximately the right size using the table saw, and then glued it to the back of the frame I had built out of the molding. I used spring clamps to hold it together overnight, and then put a few staples in just to be sure. Wood glue is amazing stuff.

Inside view of hinge.
Outside view of hinge.
Finally it was time to attach the door to the frame. I used a pair of non-mortise hinges, so-named because they can close flush without having to cut into the frame (look at your door hinges to see standard mortised hinges--see how the wood needs to be cut away so the hinges can fit?). I originally wanted to have one side of the hinge on the inside face of the box and the other on the back of the door, but I soon realized that I had neglected to consider the fact that the pin of the hinge is not flush with the rest of it, so there was no way to put the hinge in that position. I ended up putting the hinge as far to the inside of the door as I could, with the pin right next to the edge of the door.

Of course, this door is not precision engineered, so it did not close easily, or stay closed once shut. I needed to install a pair of closure mechanisms to achieve this feat. I put the piece with the roller-clamps on the inside of the frame, and then held the locking part in place with my fingers and partially closed the door until I had it in place so that the two would meet up when the door was closed.


A few screws later and I was essentially done.

It certainly isn't perfect, but I learned some good lessons. First, it pays to plan. I sort of figured this out as I went along, and I got away with it because it's just a fuse box cover in the basement of a rental property. A real piece of furniture would require a greater level of craftsmanship, which would require having some understanding of how the pieces would go together before I actually made the cuts. Second, wood is forgiving. As much as I screwed this thing up, I was able to salvage it with wood glue, clamps, Durham Wood Putty, and a few whacks with the hammer. Paint covers lots of sins as well. Finally, never get rid of scrap wood. This thing was half-built with wood I had laying around. I had the space to hold onto it until it would be needed, and it sure came in handy.

Thursday, June 9, 2011

Make ice, not puddles

We recently had our first few days in the upper 90s. The air conditioners held up fine, but we really started to miss having an ice maker. Our refrigerator, which we got off Craiglsist for $100, had an ice maker, but we had never hooked it up.


Our first step was to run a water line through the kitchen floor, into the basement, and through the wall to the laundry room, where we could easily tap into an existing line. The line came as part of a kit from Home Depot that included all the proper fittings. Working with my father-in-law, we drilled a hole in the kitchen floor, popped a hole in the basement ceiling (which knocked out a little more drywall than we intended), and drilled another hole through the wall.

The kit included a neat method of connecting to the existing water line. We simply had to clamp this device onto the old line and attach the new line. By spinning the handle, a needle punctures the old line. Spinning the handle the other way removes the the needle and allows the water to flow into the new line.  No splicing or anything--very simple.

We turned the water on and quickly realized there was a problem. A large puddle formed on the floor immediately, and continued to grow as I ran downstairs to cut the water off. I determined  that the leak was not from the ice maker itself, but rather from a small unit located at the lower back of the fridge. Clearly, it was time to open the back of the fridge. It had clearly not been opened in a while. The dust was thick. You can see the offending unit at the right of this picture.

The offending unit was some type of valve. I disconnected the old piece and found a part number. We tracked down the right piece at D&L Parts, a great appliance store off Hillsborough Street. It was only $17 or so.

The new one (below) didn't look much like the old one, and it took a little time to figure out which end was the inlet and which was the outlet. Still, we got it hooked up pretty quickly, and turned the water back on to test it...


...and it did not go well. As you can see above, I made yet another large puddle on the kitchen floor. I quickly turned the water off again. We decided that the culprit was probably just a lack of thread sealing tape, so we pulled all the tape off and redid it--much thicker this time. It was difficult to get the fittings to bite, but once they did, I cranked down on them as hard as I could, using two wrenches to get a good grip. Finally, it worked. No leaks.

After an hour, though, we still had no ice. We figured out that I hadn't opened the valve enough. Water was flowing, but it wasn't actually filling the trays. Once we got that right, the trays filled up immediately, and by the next morning, we were well on our way to a full bin of ice.

Sunday, June 5, 2011

Not a fan of the attic fan

When we bought our current house in December 2010, we immediately replaced the roof. We hired Tom Buzzard's roofing company, and they did a great job. After they were finished, however, they informed me that the slope on my roof was not steep enough for ridge vents to be effective, so they had installed an attic vent fan with a thermostat. But, since roofers don't do electricity, it was not wired up. They recommended hiring an electrician to do it, but I wouldn't be much of a DIYer if I didn't at least give it a shot. Early one morning last week, with a goal of beating the heat, I decided to head up and see what I could do.


Our attic entrance is a 12" x 12" opening in the ceiling of our bedroom's closet. I understand this type of entry is called an attic hatch or scuttle hole, sometimes shortened to "skutl" in real estate listings. Beware! this type of entry severely limits access to the attic. I am a relatively small guy in pretty good shape, and it was very difficult for me to get into and out of the attic. If I were an electrician, I would definitely charge extra if I had to use a scuttle hole to get into an attic. Luckily, I didn't have to find out what they charge.
The first step was clearing my wife's clothing from half the closet. She was not thrilled that I was going to be climbing up through her closet, but she was game, as long as none of her clothing got damaged. It was not a big deal to get it all out and onto the bed and floor of the bedroom.

Next, I got my ladder in place and assembled my tools. I didn't know what I was going to find up there, but I knew I wasn't going to want to go up and down too many times, so I tried to bring everything I thought I might need. As you can see at right, that included a pair of wire snips, a tape measure, a flashlight, needlenose pliers, a length of wire I had laying around, a current tester, electrical tape, and a bag of twist-on connectors.

As soon as I popped my head into the attic, I could see that the process was going to be technically easier, but far less comfortable, than I had planned. I could see that the fan included a box that was the thermostat, and that the box had two wires dangling from it. I could also see the wire that served the light in the bedroom closet right in front of my face. 
So I would just have to cut the existing wire, splice in my new wire to one end of the cut wire, attach the other end of the old wire (so it's  three-way connection), and then run the new wire over to the fan box and attach it. First, though, I had my wife cut off the power by throwing the main breaker. I decided to keep it simple.

My splice is at right. You can also see all the debris and nasty old insulation in my attic. It was dirty, hot, and the ceiling was very low. I did all the work on my stomach, balanced on a 2' x 4'. Not comfortable at all.
The splice into the thermostat box is visible above at left and right. Real simple, just twisted the black wire to the black, the white to the white, capped them, and screwed the ground into the back of the box. 
Then it was a matter of replacing the cover, setting the thermostat (I put it at 100 degrees F), and having my wife turn the power back on. The fan came on, and I knew it was a success. All in all, not a difficult project, but the logistics made it relatively uncomfortable. Still, it was more comfortable than paying $200+ for someone else to do the work.

*Important note: I didn't have a junction box on hand, so I thoroughly taped the 3-way splice before heading out of the attic. All connections need to be inside of a junction box to be safe. I have since acquired and installed the junction box, so I should be good to go.